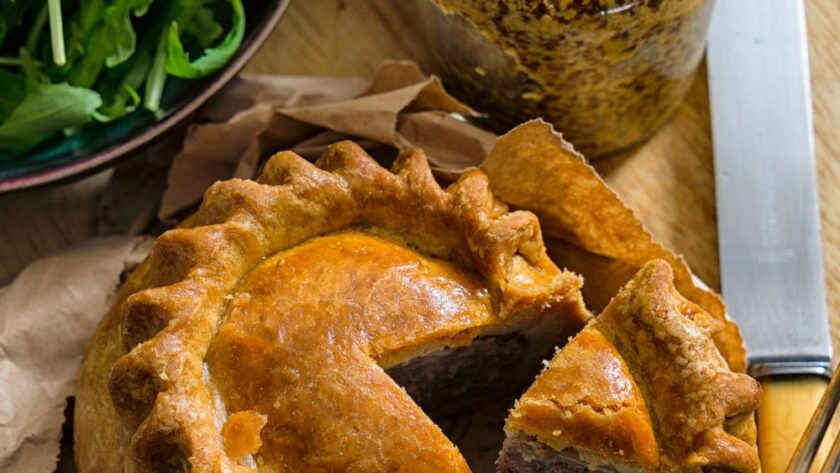
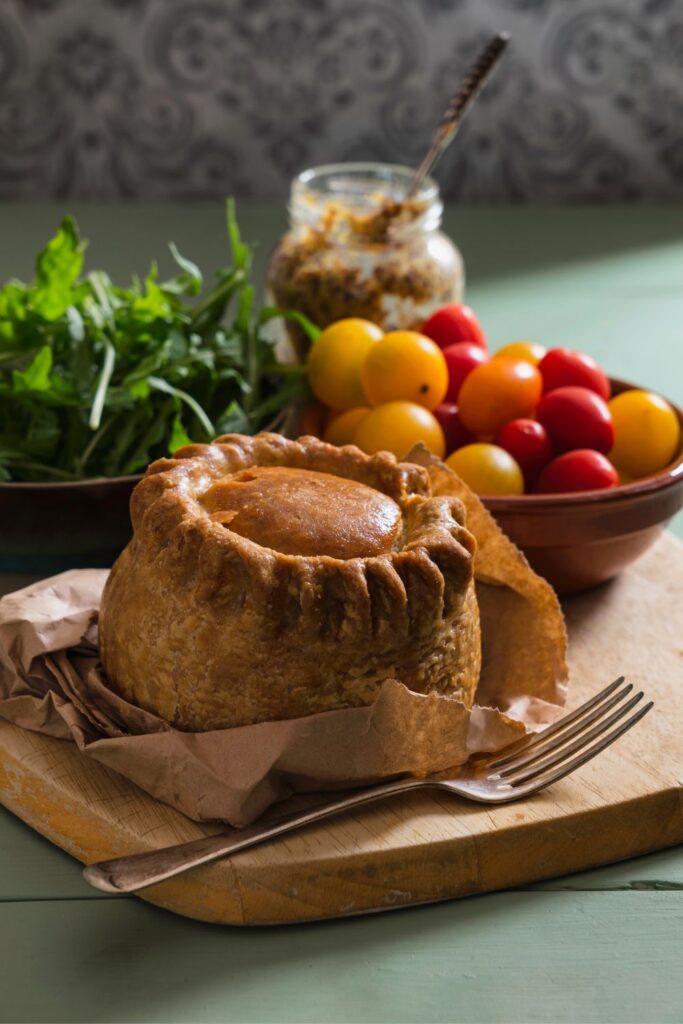
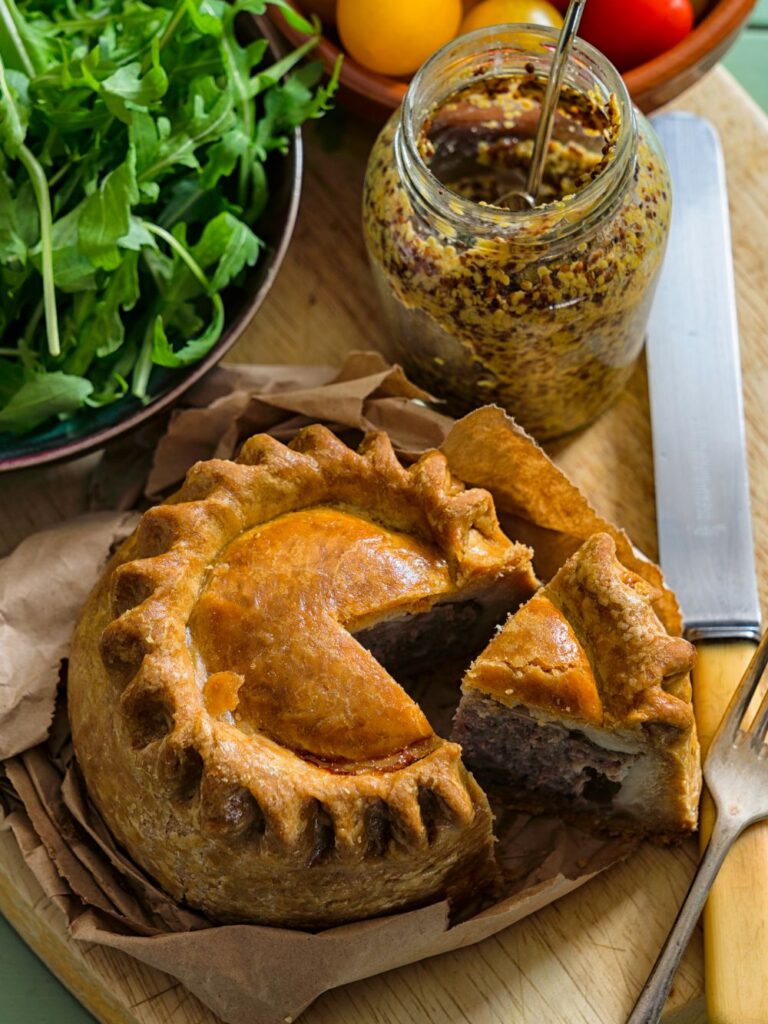
Mary Berry Pork Pie

Mary Berry Pork Pie

Mary Berry Pork Pie is a raised pie made with pork shoulder, hot water crust pastry, pig trotter, and seasoned with sage, salt, and pepper. This classic British dish takes about 5 hours and 30 minutes to prepare and can serve up to 4 people.

Try More Mary Berry Recipes:

💗 There are several reasons why you’ll love this Mary Berry Pork Pie:

  • Classic British flavor: This pork pie recipe captures the essence of traditional British cuisine, making it a perfect choice for those who appreciate the rich and hearty flavors associated with this culinary heritage.
  • Hot water crust pastry: The hot water crust pastry used in this recipe results in a robust and crisp crust that perfectly encases the flavorful pork filling. Its unique texture and taste add to the overall enjoyment of the pie.
  • Seasoned pork filling: The diced pork shoulder seasoned with dried sage, salt, and pepper provides a delicious and savory filling that is both tender and full of flavor. 
  • Savory jelly filling: The addition of pork pie jelly made from a pig trotter, water, onion, salt, and white pepper adds a delightful gelatinous layer to the pie.
Mary Berry Pork Pie
Mary Berry Pork Pie

📜 Mary Berry Pork Pie Ingredients

Hot Water Crust Pastry

  • 350 g plain flour sieved
  • 140 ml water
  • 110 g lard
  • 1 tsp salt
  • 1 egg beaten

Pork Pie Filling

  • 500 g pork shoulder diced
  • 1 tsp dried sage
  • 1 tsp salt
  • 1 tsp pepper

Pork Pie Jelly

  • 1 pig trotter
  • 1-liter water
  • 1 onion halved
  • 1 tsp salt
  • 1 tsp white pepper

đŸ‘©â€đŸł How To Make Mary Berry Pork Pie 

Making the Hot Water Crust Pastry

  1. Preheat the oven to 180°F.
  2. Place the flour in a large, ovenproof mixing bowl and place in the oven to warm. You’re not attempting to fry the flour, just warm it and the basin, so adjust the heat as needed if you don’t get to begin on the dough right away.
  3. In a saucepan, combine the water and the fat. Bring to a gentle boil, then pour into the flour and salt mixture.
  4. In a stainless steel saucepan, combine water and fat to produce a traditional British Pork Pie. Stir with a wooden spoon until well incorporated. When the dough has cooled enough to handle, knead it quickly. It will be wonderful!
  5. Woman’s hand in a white and blue mixing bowl, mixing hot water crust pastry 
  6. Place the dough on a floured surface and cut off 1/3 of it. Replace this in the mixing basin and cover it with a tea towel to keep the heat in. This off-cut will serve as the ‘cover’ for your pie or pies.
  7. You will make the ‘body’ of your pie with the remaining 2/3. If you’re creating a single huge pie, leave it alone. However, if you are creating smaller pies, as shown in the photos, split the crust into as many pies as you are making.
  8. forming pork pie dough around a crystal-cut glass 
  9. Work on one portion of the dough at a time, leaving the rest in the warm bowl.

Making the Pork Pie Jelly

  1. For my savory pork pie jelly, I use pig trotters, but you can also use gelatin sheets if you want.
  2. Place the cleaned trotter in the slow cooker with the water, onion, salt, and white pepper. Cook on high for 4 hours or low for overnight.
  3. I like to split the trotter halfway through the cooking period to allow additional gelatin to be released into the cooking water.
  4. Once cooked, drain well, reserving all of the lovely stock. The detritus can be discarded, and any extra stock can be frozen in ice cube trays and used to enrich and boost nutrients in soups, stews, and casseroles.  

Making the Pie

  1. Flour a pork pie doll or an upturned glass, then shape the warm crust into an even layer with your hands. 
  2. There should be a tiny overhang to secure the lid on, and there should be no holes or splits.
  3. Repeat with the remaining dough. Carefully remove the pastry from the glass, and wrap a strip of folded baking paper around the ‘belly’ of the pie to help it stand up. 
  4. a sloppy baking scene with empty pork pie shells awaiting filling 
  5. Combine the pork, sage, salt, and pepper. Fill each pie with 1/3 of the mixture, pressing down as needed and leaving the meat in a dome shape in the center.
  6. woman’s hand pouring a hot water crust pie with pork pie filling 
  7. Divide the ‘lid’ pastry into as many pies as you are making, and roll each piece out into a circle.
  8. Brush the overhang area with the beaten egg, then replace the lids.
  9. Seal the edges of the lids and body pastry together. Simply press the pastry together tightly, or crimp it as shown in the photographs.
  10. a woman’s hand sealing and crimping a British pork pie 
  11. Pierce a hole in the pastry with the point of a sharp knife and twist the knife to make the hole rounder and a bit larger. Because this is where you will pour your stock once it has been cooked, the hole must be large enough to accommodate your funnel tip.

Baking the Pies

  1. Brush the pies generously with egg wash all over. The more egg added, the more glossy the pies.
  2. A sloppy baking scene with an egg wash bowl, a pastry brush, and pork pies waiting for the oven 
  3. Bake the pies for 20 minutes in a preheated oven. 
  4. Reduce the oven temperature to 160°F and cook for another 50 minutes.
  5. Remove from the oven halfway through the cooking time, remove the baking paper sleeves if using, and brush with egg wash all over again. Return to the oven to continue the cooking process.
  6. Taking off the baking paper from a freshly made pork pie 
  7. Place the baked pies on the kitchen counter to cool. When at room temperature, place in the refrigerator to cool completely.

Filling the Pies with Jellied Stock

  1. Take your cold pies and gently insert the funnel tip into the lid’s hole.
  2. A funnel and jug are used to pour jelly liquid into a freshly baked pork pie. 
  3. Slowly pour your hot stock into the hole. You don’t want it to overflow, so give it some time to soak into all the cracks and crevices.
  4. When the pies are full of filling, return them to the fridge to cool completely. Do not cut into them until the stock has solidified completely, preferably overnight. 
  5. When you’re ready to eat, cut the pie into wedges to show off your work of art, and enjoy!
Mary Berry Pork Pie
Mary Berry Pork Pie

💭 Tips Recipe:

  • When shaping the crust, make sure there is a slight overhang to secure the lid, and check for any holes or splits that may cause the filling to leak during baking.
  • For the pork pie jelly, if you prefer not to use pig trotters, you can substitute it with gelatin sheets according to the manufacturer’s instructions.
  • After baking the pies, it is important to allow them to cool completely at room temperature before refrigerating. This helps set the jelly and allows the flavors to develop.
  • When filling the pies with jellied stock, pour the hot stock slowly into the hole in the lid, allowing it to soak into the cracks and crevices of the filling. Be careful not to overflow the pies.

đŸ„— What To Serve With Pork Pie?

Pork pie pairs well with tangy mustard, pickles, and a side salad with fresh greens and cherry tomatoes.

🎚 How To Store Pork Pie?

  • In the fridge: To store pork pie in the fridge for 3-4 days, wrap it tightly with plastic wrap and place it in an airtight container. 
  • In the freezer: To store pork pie in the freezer place it in a freezer bag. It can be stored for up to 3 months.

đŸ„” How To Reheat Pork Pie? 

  • In the oven: reheat at 350°F (175°C) for about 15-20 minutes until heated throughout and the crust is crispy.
  • In the microwave: heat in short intervals on medium power until warmed through, being careful not to overheat.
  • In the air fryer: preheat to 350°F and reheat for 5-7 minutes until heated and the crust is crispy.
Mary Berry Pork Pie
Mary Berry Pork Pie

FAQ’S

How Can I Keep Pork Tender?

To keep pork tender, you can marinate it, brine it, or slow-cook it. These methods help break down the meat fibers and retain moisture.

Why Is My Pork Pie Watery?

A watery pork pie can result from insufficient binding of the filling ingredients or inadequate cooking time. Ensure the filling is well combined and drained properly, and bake the pie until the filling is cooked and the pastry is golden brown.

What Type Of Pork Is Best For Pork Pie? 

The best pork for pork pie is typically cut like pork shoulder or pork butt, as they have good flavor and become tender when slow-cooked.

How To Make Crispy Crust For Pork Pie?

To make a crispy crust for a pork pie, use a hot water crust pastry with lard or butter, preheat the oven, brush the pastry with egg wash, and bake at the recommended temperature and time. 

More Mary Berry Recipes:

Mary Berry Pork Pie Nutrition Fact 

  • Calories: 943
  • Calories from Fat: 414
  • Fat: 46g
  • Saturated Fat: 17g
  • Cholesterol: 158mg
  • Carbohydrates:93g
  • Fiber: 4g
  • Sugar: 2g
  • Protein: 34g

Are You Looking For Best Mary Berry Cookbooks ? Here Are Top 5 Best Seller Mary Berry Cookbooks You Should Have:

Mary Berry Best Cookbooks

  1. Mary Makes it Easy Cookbook
  2. Mary Berry’s Baking Bible
  3. Baking with Mary Berry
  4. Mary Berry’s Simple Comforts (recommended)
  5. Mary Berry Quick Cooking

Mary Berry Pork Pie

Difficulty:BeginnerPrep time: 30 minutesCook time:4 hours Rest time:1 hour Total time:5 hours 30 minutesServings:4 servingsCalories:943 kcal Best Season:Suitable throughout the year

Description

Mary Berry Pork Pie is a traditional British dish consisting of a hot water crust pastry filled with seasoned diced pork shoulder. It is baked until golden and served with a savory jelly made from a pig trotter, water, onion, salt, and white pepper. It is a classic and delicious pie enjoyed as a snack or part of a meal.

Ingredients

    Hot Water Crust Pastry

  • Pork Pie Filling

  • Pork Pie Jelly

Instructions

    Making the Hot Water Crust Pastry

  1. Preheat the oven to 180°F.
  2. Place the flour in a large, ovenproof mixing bowl and place in the oven to warm. You’re not attempting to fry the flour, just warm it and the basin, so adjust the heat as needed if you don’t get to begin on the dough right away.
  3. In a saucepan, combine the water and the fat. Bring to a gentle boil, then pour into the flour and salt mixture.
  4. In a stainless steel saucepan, combine water and fat to produce a traditional British Pork Pie. Stir with a wooden spoon until well incorporated. When the dough has cooled enough to handle, knead it quickly. It will be wonderful!
  5. Woman’s hand in a white and blue mixing bowl, mixing hot water crust pastry 
  6. Place the dough on a floured surface and cut off 1/3 of it. Replace this in the mixing basin and cover it with a tea towel to keep the heat in. This off-cut will serve as the ‘cover’ for your pie or pies.
  7. You will make the ‘body’ of your pie with the remaining 2/3. If you’re creating a single huge pie, leave it alone. However, if you are creating smaller pies, as shown in the photos, split the crust into as many pies as you are making.
  8. forming pork pie dough around a crystal-cut glass 
  9. Work on one portion of the dough at a time, leaving the rest in the warm bowl.
  10. Making the Pork Pie Jelly

  11. For my savory pork pie jelly, I use pig trotters, but you can also use gelatin sheets if you want.
  12. I like to split the trotter halfway through the cooking period to allow additional gelatin to be released into the cooking water.
  13. Once cooked, drain well, reserving all of the lovely stock. The detritus can be discarded, and any extra stock can be frozen in ice cube trays and used to enrich and boost nutrients in soups, stews, and casseroles.  
  14. Making the Pie

  15. Flour a pork pie doll or an upturned glass, then shape the warm crust into an even layer with your hands. 
  16. There should be a tiny overhang to secure the lid on, and there should be no holes or splits.
  17. Repeat with the remaining dough. Carefully remove the pastry from the glass, and wrap a strip of folded baking paper around the ‘belly’ of the pie to help it stand up. 
  18. a sloppy baking scene with empty pork pie shells awaiting filling 
  19. Combine the pork, sage, salt, and pepper. Fill each pie with 1/3 of the mixture, pressing down as needed and leaving the meat in a dome shape in the center.
  20. woman’s hand pouring a hot water crust pie with pork pie filling 
  21. Divide the ‘lid’ pastry into as many pies as you are making, and roll each piece out into a circle.
  22. Brush the overhang area with the beaten egg, then replace the lids.
  23. Seal the edges of the lids and body pastry together. Simply press the pastry together tightly, or crimp it as shown in the photographs.
  24. a woman’s hand sealing and crimping a British pork pie 
  25. Pierce a hole in the pastry with the point of a sharp knife and twist the knife to make the hole rounder and a bit larger. Because this is where you will pour your stock once it has been cooked, the hole must be large enough to accommodate your funnel tip.
  26. Baking the Pies

  27. Brush the pies generously with egg wash all over. The more egg added, the more glossy the pies.
  28. A sloppy baking scene with an egg wash bowl, a pastry brush, and pork pies waiting for the oven 
  29. Bake the pies for 20 minutes in a preheated oven. 
  30. Remove from the oven halfway through the cooking time, remove the baking paper sleeves if using, and brush with egg wash all over again. Return to the oven to continue the cooking process.
  31. Taking off the baking paper from a freshly made pork pie 
  32. Place the baked pies on the kitchen counter to cool. When at room temperature, place in the refrigerator to cool completely.
  33. Filling the Pies with Jellied Stock

  34. Take your cold pies and gently insert the funnel tip into the lid’s hole.
  35. A funnel and jug are used to pour jelly liquid into a freshly baked pork pie. 
  36. Slowly pour your hot stock into the hole. You don’t want it to overflow, so give it some time to soak into all the cracks and crevices.
  37. When the pies are full of filling, return them to the fridge to cool completely. Do not cut into them until the stock has solidified completely, preferably overnight. 
  38. When you’re ready to eat, cut the pie into wedges to show off your work of art, and enjoy!

Notes

  • When shaping the crust, make sure there is a slight overhang to secure the lid, and check for any holes or splits that may cause the filling to leak during baking.
  • For the pork pie jelly, if you prefer not to use pig trotters, you can substitute it with gelatin sheets according to the manufacturer’s instructions.
  • After baking the pies, it is important to allow them to cool completely at room temperature before refrigerating. This helps set the jelly and allows the flavors to develop.
  • When filling the pies with jellied stock, pour the hot stock slowly into the hole in the lid, allowing it to soak into the cracks and crevices of the filling. Be careful not to overflow the pies.
Keywords:Mary Berry Pork Pie, mary berry raised pork pie, raised pork pie recipe mary berry, mary berry christmas pork pie recipe

Leave a Reply

Your email address will not be published. Required fields are marked *