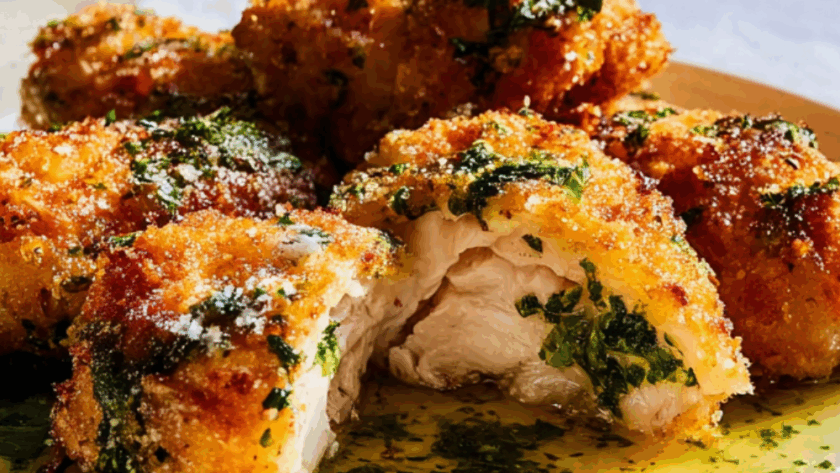
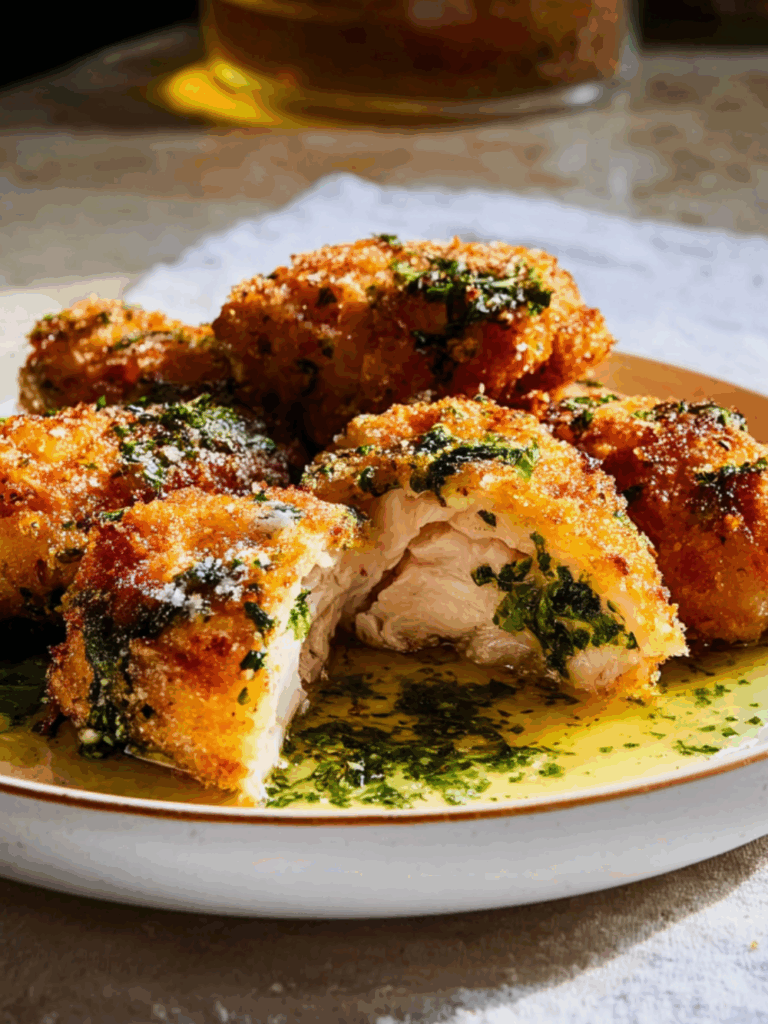
I still remember the first time I had Chicken Kiev. I was about ten, sitting at my aunt’s table in Leicester, legs swinging under a chair a bit too tall for me, when I sliced into this crispy golden chicken and—bam!—a buttery, garlicky stream gushed out like liquid treasure. I stared. She laughed. “That’s the magic bit, love.” I never forgot.
There’s something delightfully old-school about Chicken Kiev, isn’t there? It’s fancy without being fussy. Dramatic without being difficult. And let’s be honest: biting into that juicy chicken and getting a hit of melty, herby butter is just plain thrilling. Especially if you made it yourself. And it didn’t all leak out in the pan (we’ll get to that bit).
Why You’ll Love It
- Melty garlic butter hidden inside like a grown-up Kinder Surprise.
- Crispy coating that shatters when you cut in—very satisfying.
- Surprisingly make-ahead friendly (freezes like a dream).
- Customisable with different herbs, cheeses, or even chilli flakes.
- Feels restaurant-fancy, but it’s totally doable at home.
- Your guests/family/date will think you’re an absolute kitchen wizard.
Ingredients
For the garlic butter filling:
- 6 tbsp unsalted butter, softened
- 2 tsp finely chopped parsley
- 2 garlic cloves, minced
- ¼ tsp salt (skip if using salted butter)
For the chicken:
- 2 boneless, skinless chicken breasts
- ½ tsp salt
- ¼ tsp black pepper
- ¼ cup all-purpose flour
- 1 egg, beaten
- 1 cup panko breadcrumbs
- Neutral oil for frying (like canola)
To serve:
- Extra chopped parsley for garnish
- Lemon wedges, if you fancy
How to Make It
Start with the butter bomb:
Mash the softened butter with garlic, parsley, and salt in a bowl. Scrape it onto parchment and shape into a rectangle (roughly 10×6 cm). Pop it in the fridge till firm, then slice in half lengthwise.
Flatten the chicken:
Place each chicken breast between two bits of baking paper and pound it out gently until it’s about ½ cm thick. Try for a tidy rectangle but don’t stress over wonky edges.
Wrap it like a present:
Lay a piece of garlic butter in the centre of the chicken. Fold the sides in, then roll it up tight like a burrito. Wrap it in cling film, twist the ends like a sweet wrapper, and freeze for 30 minutes. This helps it hold its shape when coating.
Coat and crunch:
Set up a dredging station—flour, egg, and breadcrumbs. Dip each chilled chicken roll in flour, then egg, then breadcrumbs. Give it a good press so the crumbs really stick.
Freeze (again, yes):
Pop the crumbed chicken back into the freezer for another 30 minutes. This little freeze helps it keep its seal during frying.
Fry to golden glory:
Heat about 4 cups of oil in a heavy-bottomed pan to 190°C/375°F. Fry the chicken for 2–3 minutes until golden. Don’t worry—it’ll finish cooking in the oven.
Bake and finish:
Transfer the chicken to a baking rack set over a tray. Bake at 180°C/350°F for about 15 minutes, or until the centre hits 65°C. Let it rest for 2 minutes, sprinkle with parsley, and serve immediately.

Common Mistakes and How to Dodge Them
Why did my butter leak out?
Most likely the chicken wasn’t wrapped tight enough or you skipped the freezing steps. Those two chills are key.
How do I know it’s cooked inside?
Use a meat thermometer—when it hits 65°C (149°F), you’re golden.
Why’s the coating falling off?
You might have skipped drying the chicken or didn’t press the crumbs on firmly enough. Take your time at the breading station.
I don’t want to deep fry—can I bake it?
Absolutely! Pre-toast the breadcrumbs first with a bit of oil in a pan, then coat and bake. It won’t be as crispy, but it’s still proper lovely.
Storage and Reheating
Fridge: Store leftovers in an airtight container for up to 3 days.
Freezer: Uncooked Kievs can be frozen (pre-frying) for up to 2 months. Just go straight from freezer to fry/bake.
Reheating: Best done in the oven at 180°C for about 10–15 mins. Microwaving? Only if you must—it’ll lose its crunch.
Frequently Asked Questions
Can I make this dairy-free?
Try dairy-free butter and skip the yogurt if you’re adapting other variations. It won’t be identical, but it’ll still be rich and tasty.
Can I use chicken thighs instead?
Not ideal. You want a big flat sheet of meat to wrap around that butter—breasts are best here.
Can I add cheese inside?
Yes, a bit of grated parmesan or mozzarella mixed into the butter works like a charm.
Nutrition Facts (Per Serving)
- Calories: 773 kcal
- Fat: 46g
- Carbs: 28g
- Protein: 59g
- Sodium: 1338mg
- Sugar: 1g
Try More Jamie Oliver Recipes:
- Jamie Oliver Chicken And Bacon Casserole
- Jamie Oliver Chicken Cacciatore Slow Cooker
- Jamie Oliver Chicken Chilli Con Carne

Jamie Oliver Chicken Kiev
Description
Crispy outside, garlicky-buttery inside, this retro Chicken Kiev is a dinner showstopper with serious comfort food vibes.
Ingredients
Instructions
- Mix butter, garlic, parsley, and salt. Chill in a rectangle and cut in half.
- Pound chicken breasts flat and season. Place butter in centre and roll tightly.
- Wrap in cling film and freeze 30 minutes. Coat in flour, egg, breadcrumbs.
- Freeze again 30 minutes. Fry 2–3 minutes per side until golden.
- Bake at 180°C for 15 minutes until cooked through. Let rest 2 minutes.
- Sprinkle with parsley and serve hot.
Notes
- Freeze steps are essential to seal butter inside—don’t skip.
- Panko breadcrumbs give a crispier finish than regular ones.
- Always rest after baking—helps everything settle.
- A meat thermometer makes this foolproof.